quigs.blog

WriteFreely preview — text imported from Ghost

Safari users rejoice! StreetPass is a browser extension that helps you find interesting people on Mastodon. I've been waiting for Safari support for a while and today I noticed it's here!

I particularly like how it maintains a running list of the accounts associated with various web sites you visit throughout the day. For example, here's my experience after two minutes:

A screenshot of StreetPass in action showing discovered accounts with quigs.blog in the background.

My only disapointment is that it does not yet support iOS Safari, but maybe @tvler@mastodon.social will add that soon.

StreetPass for Mastodon

StreetPass: Find your people on Mastodon

#apple #openweb #mastodon #fediverse #safari #usefultool

In an interview with Russ Roberts on EconTalk, author and futurist Kevin Kelly convincingly suggests that we should treat AIs like Midjourney and ChatGPT as alien intelligences (in a non-spooky way):

I've been using the AI image generators for a year now, every day making AI art and they have different personalities...

But in every case, they're alien—the way that they do things because they're running on a different substrate than, than what we run on.

Their creativity is legitimate. It's really creative, but it's off, it's different than us. It's different, it's alien. They have a slightly different alien way of doing it. And that is, it's true benefit.

That's the main reason why they're valuable is because they're not doing it like humans. When they start to do proofs, they're not gonna do it like a human does it.

If they have/when they have consciousness, it'll be slightly different. It will be akimbo from us because it's running on a whole different thing. It's different latencies in all different ways in which is gonna be different. And that is its benefit.

Video

Listen to the full interview on:
Apple Podcasts
Overcast
Google Podcasts

#technology #ai #artificialintelligence #aliens #podcast #quotes #interview

Quite frequently I find myself needing to import a module to gain access to a type (usually a model), but I never interact with that module again. Recently I discovered simple way to skip having to put import ModuleName at the top of my code. This trick is especially handy in SwiftUI, but works for any use case.

Here's an example, let's say a user wants to see their weight from HealthKit in either pounds or kilograms. To do so they press a button. In order to change this information we will create a mock class that interacts with the health data store and returns the current unit for the user's weight:

import HealthKit
class DataProvider: ObservableObject {
    @Published var unit: HKUnit?
    
    func replaceUnit(_ unit: HKUnit) {
        self.unit = unit
    }
}

Back in the view, we display the current unit, and provide a button to change the unit:

import SwiftUI
import HealthKit
struct ContentView: View {
    @StateObject var provider = DataProvider()
    var body: some View {
        VStack {
            Text("Unit type: \(provider.unit?.unitString ?? "<No Unit>")")
            Button("Replace Model") {
                if let unit = provider.unit?.unitString, unit == "kg" {
                    provider.replaceUnit(HKUnit(from: "lb"))
                } else {
                    provider.replaceUnit(HKUnit(from: "kg"))
                }
            }
        }
        .padding()
    }
}

This is pretty simplistic, but imagine you are working on an app with many different views, all which need access to HealthKit objects like HKUnit, HKQuantityType, or HKSampleQuery. Every time you need to create a new HealthKit object for the DataProvider to interact with, you will need to include the import statement for your View to be able to initialize a HealthKit type.

A simple solution

A nice feature of Swift is that you can initialize an object without naming it directly with .init(). Once the compiler knows about DataProvider.replaceUnit(_ unit: HKUnit) it remembers the HKUnit type contextually, which allows you to create any new HKUnit in the body of the replaceUnit method without explicitly using its type:

import SwiftUI
//import HealthKit //Not needed any more!
struct ContentView: View {
    ...

            Button("Replace Model") {
                if let unit = provider.unit?.unitString, unit == "kg" {
                    provider.replaceUnit(.init(from: "lb"))
                } else {
                    provider.replaceUnit(.init(from: "kg"))
                }
            }
        }
        .padding()
    }
}

Once you get used to typing .init instead of the type's name, your import statement lines will drop considerably.

The only catch to this approach is that you can't declare a variable and initialize the HKUnit type. It has to be done in-line as a parameter of .replaceUnit(:), meaning this won't work:

let pound = HKUnit(from: "lb")
provider.replaceUnit(pound)

#apple #todayilearned #programming #swiftui #swift #ios #developer #development #til

This post is the first post to be published on the Fediverse directly from @quigs_blog@quigs.blog! I wrote the Ghost CMS integration myself and will be writing about that experience in the near future.

Enjoy the rest of your day! 👋

Have you noticed that all the examples on Apple's website, on Medium, and by prominent SwiftUI bloggers only use List views for the sidebar(s) and don't have a NavigationStack in the final detail view that they push additional content onto? There's a reason for that, and unfortunately it's not a pleasant one.

If you're looking to build a seemingly simple split-view app with a 1-depth sidebar and an n-depth detail view, using List in the sidebar view is a fine choice. But if you do not want the cookie-cutter look and feel List is not your friend. Unfortunately, NavigationSplitView really, really wants you to use List and if you don't use one then don't you dare try to programmatically push more content onto the detail view's navigation stack.

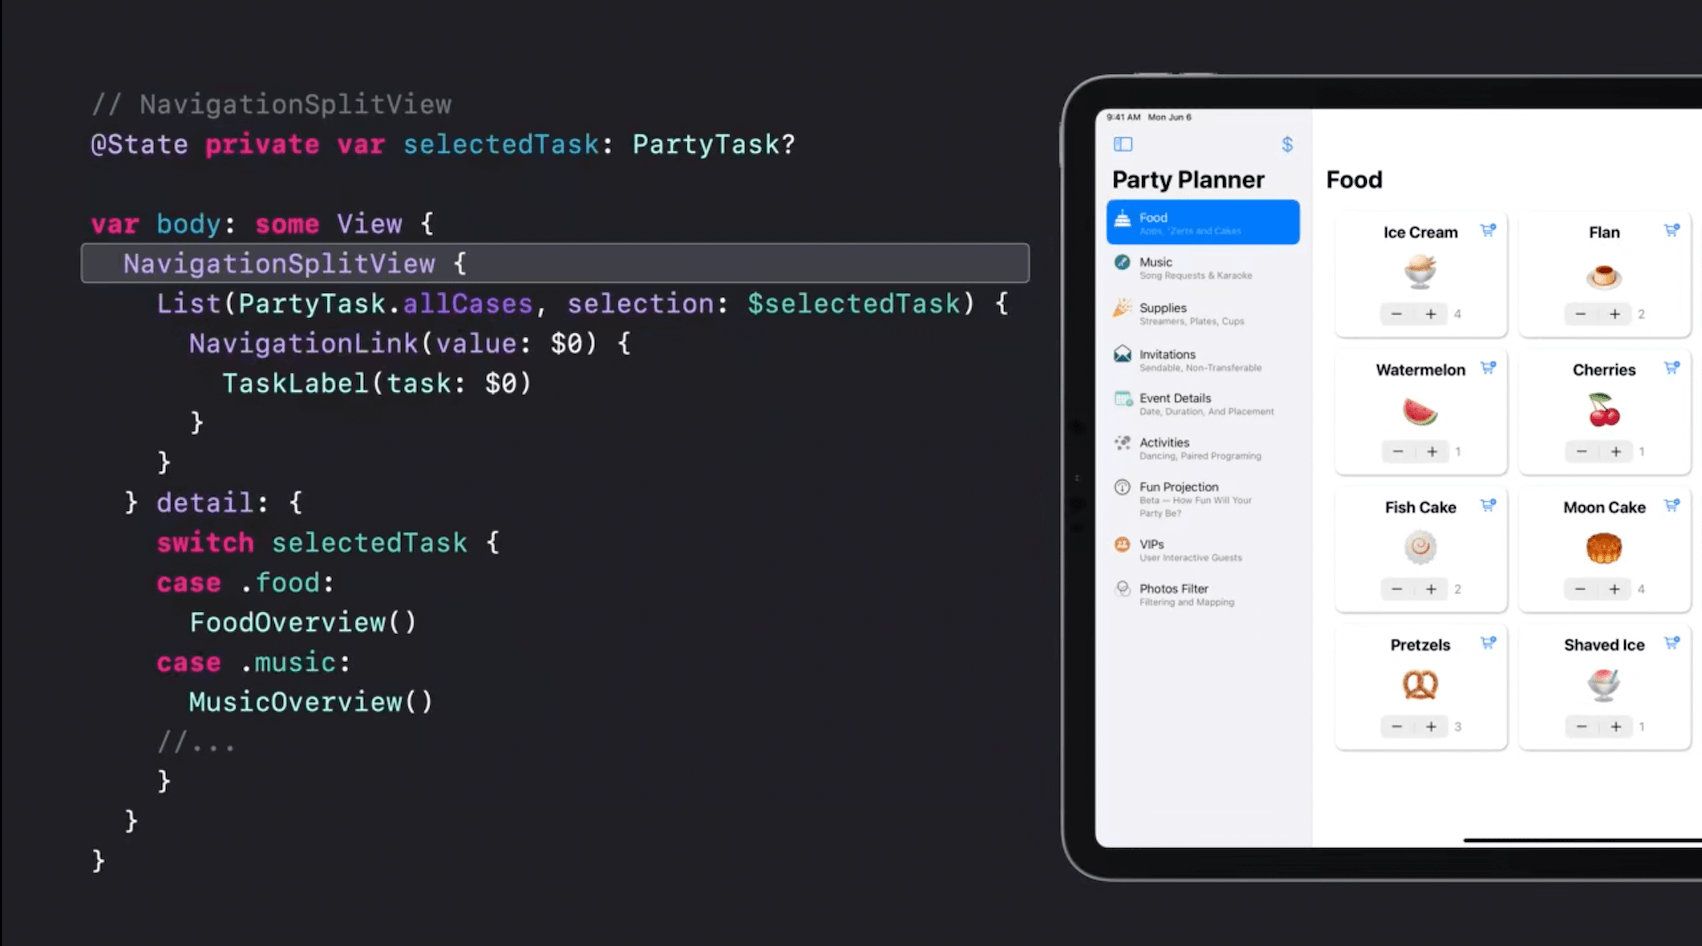
This split view demo from WWDC looks great, but what if your side-bar UI would look better if it were layed out as a grid?

At first glance, dropping the sidebar List view seems to work fine. I will be modifying Majid Jabrayilov's excellent split view code example to demonstrate the limitations (shortcomings? Bugs?) of SwiftUI 4's NavigationSplitView. First let's keep the List-backed sidebar and try to programmatically navigate two levels deep in the detail view:

struct ContentView: View {
    @State private var selectedItem: String?
    @State private var navPath = NavigationPath()
    
    @State private var folders = [
        "All": [
            "Item1",
            "Item2"
        ],
        "Favorites": [
            "Item2"
        ]
    ]
    
    var body: some View {
        NavigationSplitView {
            List(selection: $selectedItem) {
                ForEach(folders["All", default: []], id: \.self) { item in
                    NavigationLink(value: item) {
                        Text(verbatim: item)
                    }
                }
            }
            .navigationTitle("All")
        } detail: {
            NavigationStack(path: $navPath) {
                VStack {
                    if let selectedItem {
                        Button("Button \(selectedItem)") {
                            navPath.append(selectedItem)
                        }
                    } else {
                        Text("Choose an item from the content")
                    }
                }
                .navigationDestination(for: String.self) { text in
                    Text(verbatim: text)
                        .navigationTitle(text)
                }
            }
        }
    }
}

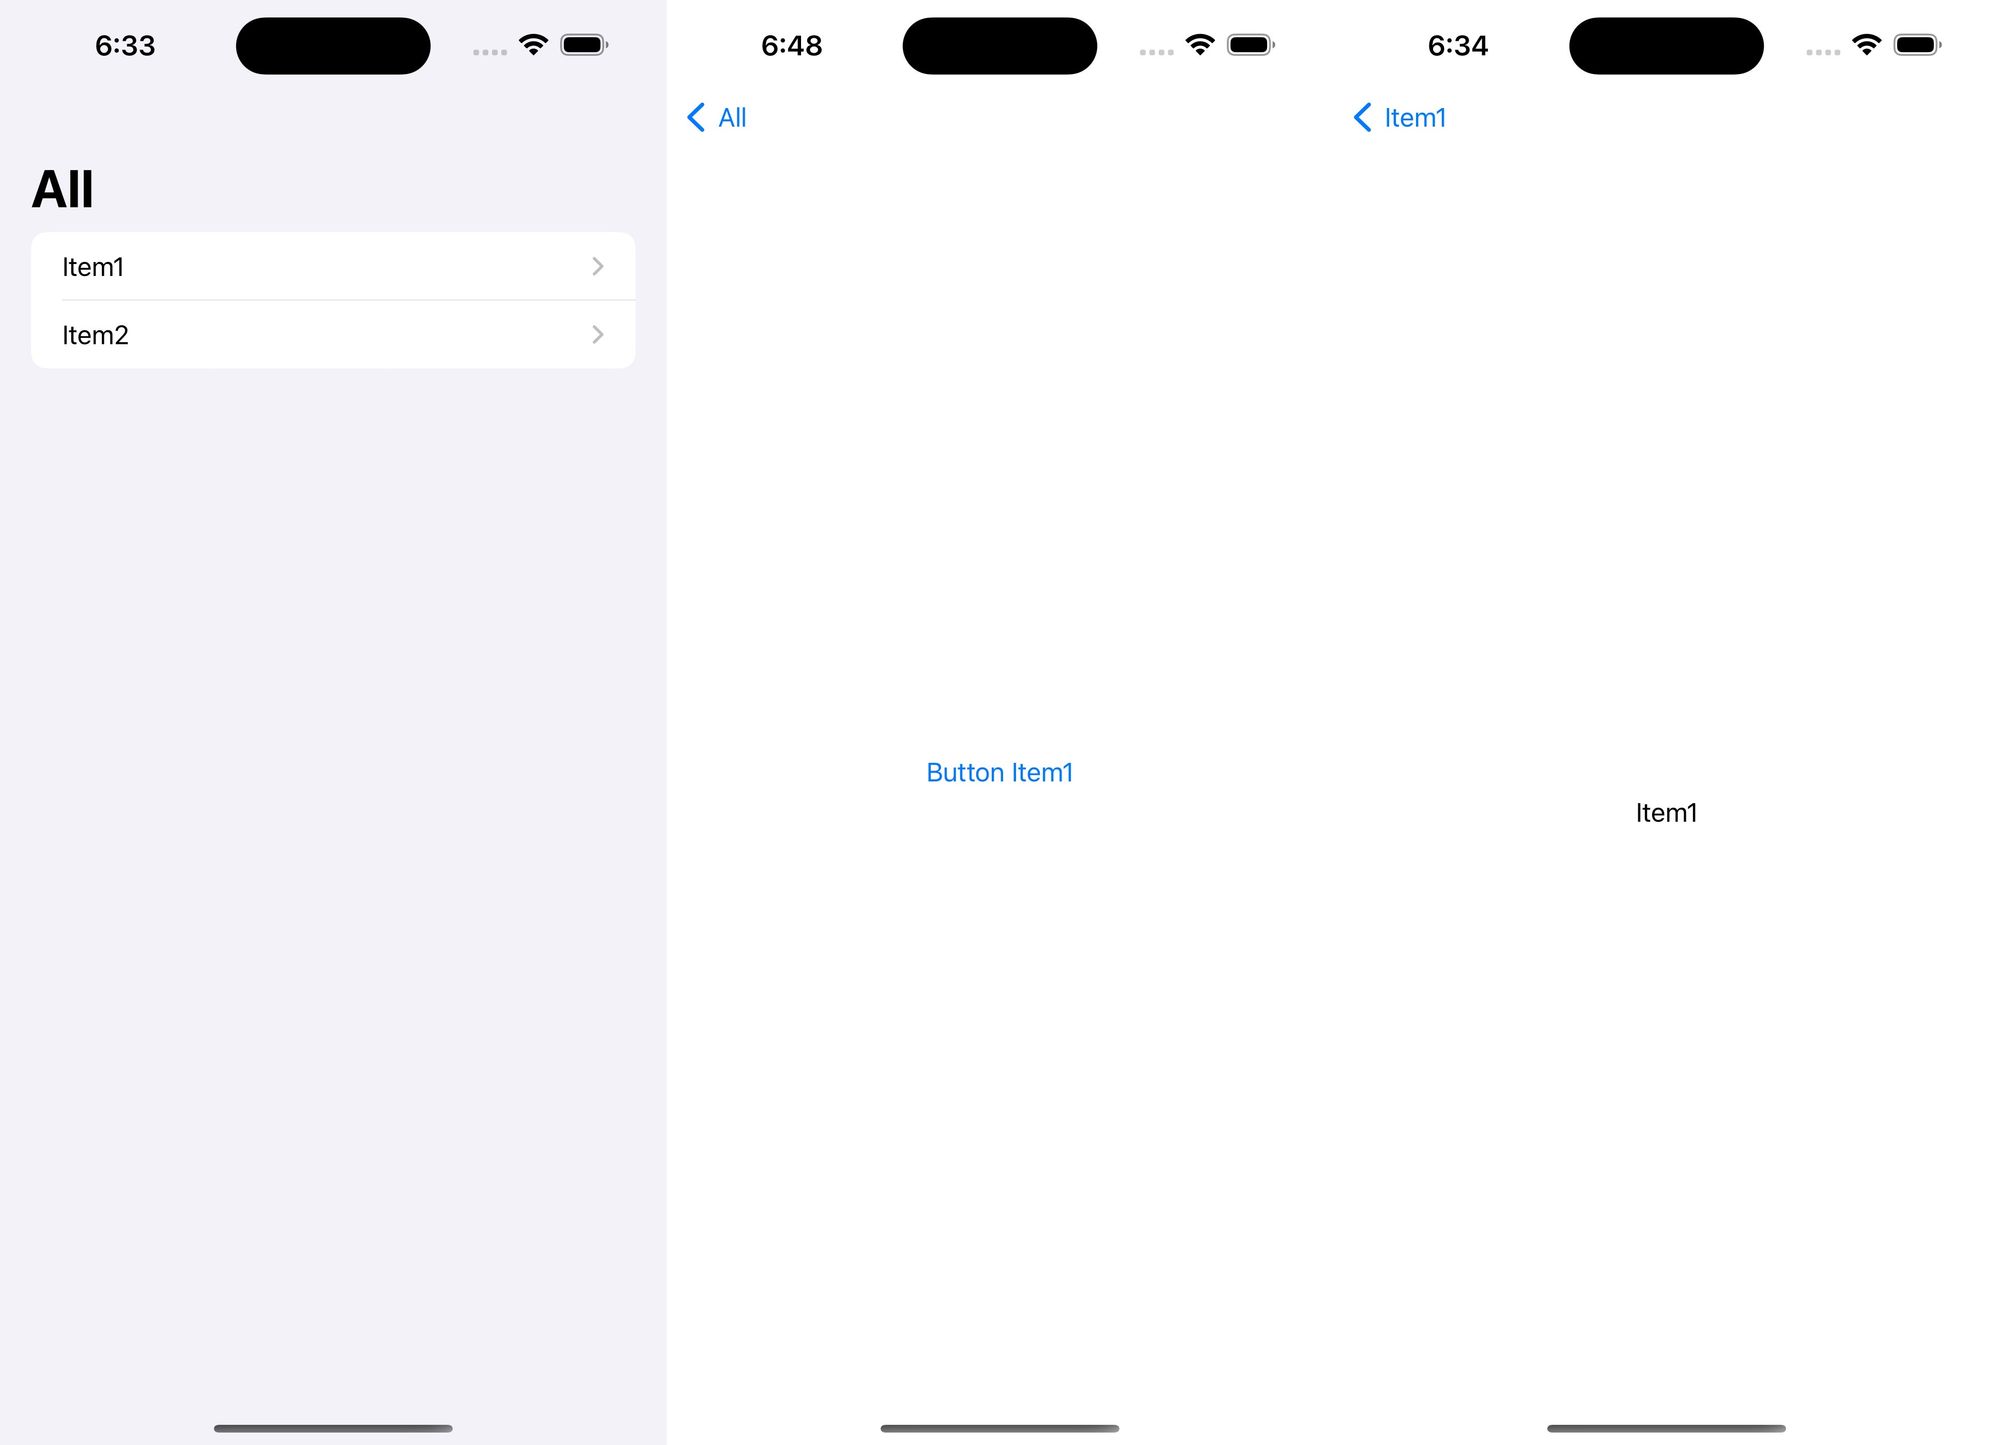
This works great, and if you select the “Button ItemN” button, you will see it programmatically pushes a view onto the detail view's stack.

A 2-level deep detail view on a NavigationSplitView running on an iPhone/compact horizontal size class.

Now let's get rid of that bog-standard List view in the sidebar and replace it with a horizontal grid:

struct ContentView: View {
    @State private var selectedItem: String?
    @State private var navPath = NavigationPath()
    
    @State private var folders = [
        "All": [
            "Item1",
            "Item2"
        ],
        "Favorites": [
            "Item2"
        ]
    ]
    
    let rows = [GridItem(.fixed(30))]
    
    var body: some View {
        NavigationSplitView {
            ScrollView {
                LazyHGrid(rows: rows) {
                    ForEach(folders["All", default: []], id: \.self) { item in
                        NavigationLink(value: item) {
                            Text(verbatim: item)
                        }
                    }
                }
            }
            .navigationTitle("All")
        } detail: {
            NavigationStack(path: $navPath) {
                VStack {
                    if let selectedItem {
                        Button("Button \(selectedItem)") {
                            navPath.append(selectedItem)
                        }
                    } else {
                        Text("Choose an item from the content")
                    }
                }
                .navigationDestination(for: String.self) { text in
                    Text(verbatim: text)
                        .navigationTitle(text)
                }
            }
        }
    }
}

It looks great (🙃). Let's test and then ship it!

A svelte grid layout in the side bar instead of a List . 🔥!

As soon as we select an item though, we get a runtime error:

A NavigationLink is presenting a value of type “String” but there is no matching navigationDestination declaration visible from the location of the link. The link cannot be activated.

Ugh. Let's fix that by providing the sidebar view with a .navigationDestination. We will move the detail view to it's own struct so it can be re-used.

struct ContentView: View {
    @State private var selectedItem: String?
    @State private var navPath = NavigationPath()
    
    @State private var folders = [
        "All": [
            "Item1",
            "Item2"
        ],
        "Favorites": [
            "Item2"
        ]
    ]
    
    let rows = [GridItem(.fixed(30))]
    
    var body: some View {
        NavigationSplitView {
            ScrollView {
                LazyHGrid(rows: rows) {
                    ForEach(folders["All", default: []], id: \.self) { item in
                        NavigationLink(value: item) {
                            Text(verbatim: item)
                        }
                    }
                }
            }
            .navigationDestination(for: String.self) { selection in
                DetailView(navPath: $navPath, selectedItem: selection)
            }
            .navigationTitle("All")
        } detail: {
            NavigationStack(path: $navPath) {
                DetailView(navPath: $navPath, selectedItem: selectedItem)
            }
        }
    }
}

struct DetailView: View {
    @Binding var navPath: NavigationPath
    let selectedItem: String?
    var body: some View {
        VStack {
            if let selectedItem {
                Button("Button \(selectedItem)") {
                    navPath.append(selectedItem)
                }
            } else {
                Text("Choose an item from the content")
            }
        }
        .navigationDestination(for: String.self) { text in
            Text(verbatim: text)
                .navigationTitle(text)
        }
    }
}

When we run this we get to the first level of the detail view, but when we select the “Button ItemN” programmatic navigation button... nothing happens. And this is where it all falls apart.

As of this writing, Jan 1, 2023, on Xcode 14.2 there is no way (that I've found) to programmatically navigate to the second level of the detail view. SwiftUI just doesn't do anything. There are no errors or warnings in the debug console. There is just silence and no navigation.

In fact, the only way to get the detail view to push a second level deep without a List-backed sidebar is to get rid of programmatic navigation on the detail view altogether and replace the button with a NavigationLink:

struct DetailView: View {
    @Binding var navPath: NavigationPath
    let selectedItem: String?
    var body: some View {
        VStack {
            if let selectedItem {
                NavigationLink(value: selectedItem) {
                    Text("NavigationLink \(selectedItem)")
                }
            } else {
                Text("Choose an item from the content")
            }
        }
        .navigationDestination(for: String.self) { text in
            Text(verbatim: text)
                .navigationTitle(text)
        }
    }
}

A navigation split view with a grid-based “sidebar” view and a NavigationLink in the first detail view.

Great! It works now—but only if your user selects the navigation link directly. As with many things in SwiftUI over the last 4 years, this feels like such simple edge case, and yet there's nothing that can be done about it. Our options are either:

  1. Host a UISplitViewController in our SwiftUI app and manually handle navigation.
  2. Don't programmatically navigate after the first detail view.
  3. Use a List for the sidebar view and deal with the visual constraints of a List.

Hopefully this is something the SwiftUI team at Apple can resolve soon. iOS 16 brought a huge quality-of-life improvement to navigation on SwiftUI. It would be nice to see this fixed before iOS 17, but until then if you require a unique-looking UI that navigates sanely, don't let your UIKit skills atrophy just yet. SwiftUI continues to be “close” but not quite “there” yet for another year.

#howto #programming #swiftui #swiftui4 #hacks #workarounds

If you're curious or confused by all the hype about the Twitter-like social network called Mastodon, but all the jargon and tech lingo are giving you cold feet about trying it out, this three-point guide is all you need to get started.

Just like you don't have to be a mechanical engineer to drive your car, you don't need a tech degree to use Mastodon. If you've used email, Facebook groups, or Twitter, you are 1/3 to 3/3 of the way to understanding Mastodon.

It's Similar To Email

Maybe you're alice@aol.com, or bob@gmail, or charlie@yahoo.com. You're that person who signed up for an email account from one company years ago but you don't think twice about sending mail to your friends whose addresses have a different company after the @-symbol than you.

Mastodon works in a similar fashion. Your Mastodon “address” is your @username@server.domain. Mastodon uses an @-symbol in front of the username so that it doesn't get confused with an email address. If @alice@mastodon.social  follows @bob@home.social she will see all of Bob's Mastodon posts just like she would see Bob's emails from bob@gmail.com if he CC'd her on a group email. But remember, Mastodon and email are not the same. If Alice tries to email @bob@home.social from alice@aol.com he won't see her message.

Like email, the first step to getting started on Mastodon is to pick a community  (the text after the second @-symbol). It is also called a server or an instance. The best option is to ask your friends and family if they have a Mastodon and what community server they are on.

Because so many people are interested in Mastodon right now, many Mastodon server computers are overloaded, so if you join a large community and are frustrated by how slow it is, don't give up! Size doesn't matter for finding and following people. Smaller communities are faster for now and the community you join doesn't matter if you are looking to explore Mastodon. You can find servers and communities at  https://mastodon.help/instances/ and sort them by highest or lowest users.

It Works Like A Facebook Group

You've spent the last several years building your circle of friends and family on Facebook. Your timeline feed shows friends sharing memes, grandparents talking about grandkids, and coworkers talking about sports.

But you're also part of a choir Facebook group, or a highschool alumni group. You can post about choir practice and share it with everyone you're Facebook friends with, or you can just share it with the choir group. Mastodon works the same way in that you choose what visibility to assign to your post before you share it.
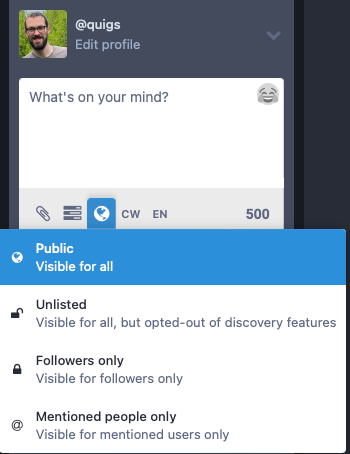
A screenshot with the mastodon post visibility settings displayed.

The different types of visibility options your Mastodon post can have.xx

Unlisted: The visibility setting that is the most like a Facebook Group is “Unlisted”. If you don't want your post to be seen by the entire internet (like the way Twitter works) you can set your post to “Unlisted” before you share it. You can also configure your account to set posts to “Unlisted” by default (or any other visibility setting). When you first sign up all posts are public by default.

Just a warning, though! The only difference between posting on Mastodon and posting to a Facebook Group is that, unlike on Facebook, anyone who follows you can also see your Unlisted posts.

Followers Only: The other Mastodon visibility setting that behaves similar to Facebook is “Followers only”. This is pretty self-explanatory and works like your regular Facebook posts posted to your timeline (not to a group). If you don't want your local Mastodon community/group to see your post, choose “Followers only”.

It's A Lot Like Twitter

Mastodon will feel pretty familiar to you if you're comfortable around Twitter. Like Twitter your Mastodon posts are public to everyone (even those people outside the community or server you joined). Also like Twitter, people can follow you without your approval, or you can lock your accoutn down and review requests to follow you and reject the ones you don't want.

The Twitter algorithm is great at recommending you random things, but if you want to tailor your feed to things that interest you, you're going to have to follow people. When you first launch Mastodon your feed will be empty! That's because you are not following anyone. You can switch the web site, or the app view to display your local community, explore hashtags (and follow them!), or open up to the firehose of all the Mastodon communities (aka the Federation).

A screenshot of Mastodon with the feed types on the right and an empty home feed on the left.

An empty Home 🙁

Unlike Twitter, there is not algorithm curating your Home feed! The Home feed only shows the stuff the people you are following share (and sometimes the stuff their followers share). Because their is no algorithm, only Boosts (think of them as Retweets) show up in other people's feeds. If you star (favorite) a Mastodon post, only the author will see that—it won't cause the starred post to show up in anyone else's feed or boost engagement.

Also, if you are coming from Twitter and want to find all the people you were following there who are also on Mastodon, check out Debirdify.

Was That Too Confusing?

I'm not going to lie, Mastodon is still quite different from what you're used to and adding followers to your feed can be clunky at times. I often copy and paste the account name (Eg: @user@server) into the Mastodon search field which then gives me a follow icon. But things will get easier. After all people had a hard time getting used to email in the 90s and Facebook in the 2000s and Twitter in the 2010s.
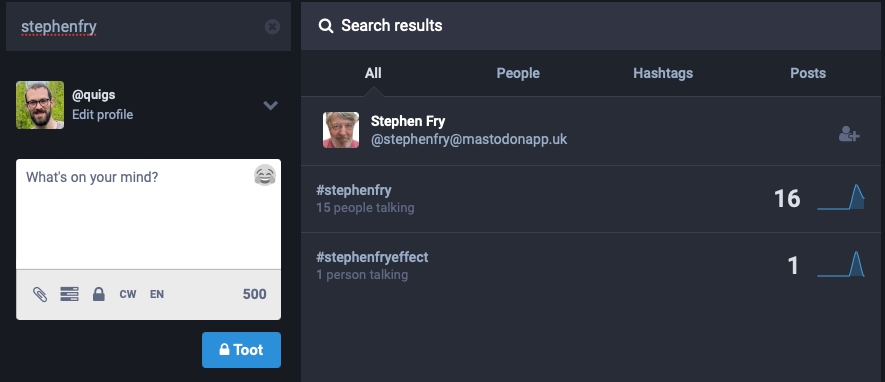
Searching for users also displays a follow button on the right side of the results.

You will figure it out! Go sign up for Mastodon and explore. Give it some time and enjoy the community. I recommend typing #introduction into the search field. That hashtag will display lots of new, interesting Mastodon users introducing themselves and sharing tips.

Once you get some experience under your belt, check out https://mastodon.help for more advanced concepts and settings, and if your feed is empty, follow me at @quigs@hachyderm.io! It won't be empty for long!

#technology #internetculture #howto

No, I'm not crazy. Hear me out.

I just published a new issue of For The Learn about apocalypses after being inspired by the podcast and book by Dan Carlin (of Hardcode History fame) and then I started seeing apocalypses everywhere in both daily and historic life, even as recently as two years ago.

Carlin's book, The End Is Always Near: Apocalyptic Moments, from the Bronze Age Collapse to Nuclear Near Misseswas a great read, covering relatively “bloodless” apocalypses of empires from Assyrian to Roman to the very “bloody” incredible Black Plague that killed 60% of Europe's population. One of the key points that Carlin makes in his book is that what history views as an “apocalypse” may have been more like a transition to a new dynamic. He points out that although the people who experienced the “transition” probably viewed like an apocalypical disaster, after reading it I started noticing the many transitions (violent or peaceful) in other books I was reading.

Anyways, if writing that connects distant topics into a common thread interests you check it out the latest issue of my occasional email and RSS newsletter over at For The Learn, titled The Past, Present, and Future Apocalypse. Every issue includes a “Links of Interest” section of currated books, podcasts, videos and articles which functions like that “Suggested Videos” wormhole section of YouTube that you find yourself falling into. 😜

Issue #3: The Past, Present, and Future Apocalypse

What comes to mind when you picture the Apocalypse? A lifeless, irradiated planet? The end of times from religious texts? What did our ancestors imagine and experience? What about our future selves or our descendants?

#crosspromotion #connectingideas #history #futurism #politics #religion

Scott Feeney on his blog post, “Four Twitter Features Mastodon Is Better For Not Having” points out several negative aspects of Twitter's design that the Twitter-like Mastodon does not have:

If you’ve gotten in an intense argument on Twitter, you might dread this “So-and-so liked 10 Tweets you’re mentioned in” notification. It tends to mean someone went through and gave kudos to every person arguing with and insulting you. It’s stressful to be pinged over and over with this—which is exactly why we’re all tempted to do this to people we think crossed a line. In doing so, we, again, increase the reach of content we dislike.

The other features he mentions are quite refreshing too.

Also, as of today Mastodon has over 1 million active users! 👀

Eugen 💀 (@Gargron@mastodon.social)

Hey, so, we’ve hit 1,028,362 monthly active users across the network today. 1,124 new Mastodon servers since Oct 27, and 489,003 new users. That’s pretty cool.

#technology #internetculture #crosspromotion #opinion #howto

Every five to ten years, a popular social network gets hit with a crisis. Twitter's current Musk-y crisis feels precipitously different than its previous ones.

Today I came across a thread by John Bull that introduced me to the perfect word to describe 2022 Instagram and Twitter: The trust thermocline. It describes the sudden point in which various individuals lose trust in an an institution or organization en-masse.

I remember the glory days of Digg, Slashdot and MySpace. Suddenly they went from being huge communities with massive network effect to a shadow of a community that I no longer use. Twitter currently feels like it's teetering on that edge.

But they'll only MOVE when they hit the Trust Thermocline. The point where their lack of trust in the product to meet their needs, and the emotional investment they'd made in it, have finally been outweighed by the physical and emotional effort required to abandon it. — John Bull (@garius) November 3, 2022

At several points in the last 6 years I felt that the temperature of several social networks changed suddenly for the worse. In 2016 Facebook was no longer fun and I stopped participating in 2017. In 2019 I stopped following Medium content because it all sounded like self-promotional TED-Talk-Meets-LinkedIn echo chamber of pseudo-intellectual bullshit (on practically any topic).

This year alone I deactivated my Instagram in the summer when I realized it just felt like a confused TikTok of ads overwhelming my friends' posts and videos. Then just this week I re-invested my interest in Mastodon, a decentralized Twitter-like social network born in 2016 that over the last week has gained over 200,000 new users (on top of its several-hundred-thousand existing active accounts).

We shall see what the future holds for Twitter. It still has an enormous amount of momentum due to its size, but it may never be “the” place it was for so many niche communities. Mastodon may not win the lion's share of the Twitter-exodus, but it stands a good chance of becoming somewhat relevant now.

Enjoy the thread and follow John on Mastodon!

One of the things I occasionally get paid to do by companies/execs is to tell them why everything seemed to SUDDENLY go wrong, and subs/readers dropped like a stone. So, with everything going on at Twitter rn, time for a thread about the Trust Thermocline /1 — John Bull (@garius) November 3, 2022

#news #technology #popculture #todayilearned

A forced experiment in living like the ancestors did.

Last week I found myself outside of the United States without a functioning phone. “Let's descend under three feet of water and take a photo with my phone”, I suggested to the dive master. “I'm not really comfortable with that. I'm afraid I will drop it in the lake. I will take a photo of you on the surface”, he replied. One minute and three splashes later, I had a memorable photo of me and my friends scuba diving at 5,000ft (1,520 m) and a camera module filled with water. I quickly copied the photos off my phone onto my iPad and then my phone got painfully hot and shut off. Odd considering I washed it with soap and water under a faucet the week before.

I was 2,000 mi (3,200 km) from home and my only working technology was a Wi-Fi-only iPad and a 3 year old cellular Apple Watch Series 5 whose cellular function didn't work in Latin America. Three days later I flew back home like my ancestors did—paper boarding passes, streaming HBO to my own 11-inch screen on the plane, and navigating the airport and public transit via the light of the stars—err turn-by-turn instructions.

When I bought the very first Apple Watch in 2015 I was excited to keep my phone in my pocket more, or leave it at home. Unfortunately the first four years of Watch ownership taught me that if I wanted to do anything, I should do it on my phone first. The impression I maintained as an early adopter was that the Apple Watch was too slow and the 3rd party apps were too limited to do much of anything except glance at notifications and track my heart rate. Finally in 2019 Apple released both the hardware and software necessary to make the Apple Watch a stand-alone device: a larger screen, better battery life, faster chips, and yearly updates to an operating system (that gave 3rd party apps the ability to do app-y things like make network requests directly without the phone to chaperone it). But despite paying $15 a month (!!) for cellular service I treated my watch's independant capabilities solely as an emergency device in case my phone was unavailable.

That perception changed pretty quickly last week. Of all the years to live without a phone for a couple weeks, 2022 is a fantastic time to do so. Although my watch's cellular plan didn't work in Latin America, as soon as I got back to Wi-Fi I was able to stay in touch with friends and family via text or “phone” calls. Once I was back in the states, a flurry of iMessages came in the moment I turned off Airplane mode. Before taking public transit from the airport to the Amtrak station, Apple Maps told me what station to get off at. Driving to the certified Apple Repair Center and then running further errands was incredibly easy thanks to turn-by-turn directions and a responsive search experience (“Hey Siri, driving directions to CostCo”). I paid for food and fares using Apple Pay and never pulled out my wallet. I learned that all the UPS store near me were closed for the weekend. In fact, relying on just an Apple Watch while away from home went so smoothly that I barely missed my phone.

In fact, the only frustrations I had were needing to charge my (three year-old) watch 4 times a day, poor cellular signal (in areas where my phone worked fine), the inability to take pictures, SMS texts not being forwarded to my watch, Slack and other iPhone-centric apps not showing me notifications, and the inability to look up certain information on the go. As I rushed off my plane and took Chicago's L-Train to Union Station I arrived just in time for an earlier train home—only to find out upon arriving that the earlier train had been canceled.

As Apple makes it easier and easier with SwiftUI to share code and UI between the iPhone and Apple Watch, I hope more developers will make simplified interactions for Apple Watch and advertise them loudly. Most of the non-Apple apps on my Watch are useless without the iPhone to hold its hand. While some watchOS limitations make this a necessity, not all apps need to give up the minute the phone disappears from the equation. Amtrak could have let me search for train schedules, Slack could tell me someone messaged me, Parcel could inform me of deliveries, and my 2-factor SMS codes ought to be forwarded to my watch (thankfully many companies still allow for “landline” phone call's where a robot dictates codes).

I occasionally miss having a phone, and I regret not learning about Express Replacement before dropping off my phone for “3-10 business days”, but in the grand scheme of things, if you want to “digital detox” or just remove distractions without unplugging entirely, a cellular Apple Watch is a surprisingly viable option for our modern life style. And if you don't believe me, here's a list of everything I could do with just my Apple Watch:

  • Scribble or dictate text messages to friends and family.
  • Phone friends and family.
  • Navigate unfamiliar parts of the city by foot, public transit and car.
  • Build a grocery shopping list and check off items as I put them in my cart.
  • Pay for gas, food, and transit fares.
  • Join Wi-Fi networks when cellular was unavailable.
  • Look up business closing hours.
  • Listen to podcasts and music.
  • Convert currencies and calculate tips.
  • Verify my identity when financing a purchase.
  • Check email.
  • Unlock doors and turn on/off lights. #smarthome
  • Find missing TV remotes.
  • Be notified when I've left my wallet, iPad, or keys at unfamiliar locations.
  • Search the web for various facts and questions. (Eg: “show pictures of wolf spiders”)

So is traveling and living without a phone similar to what our ancestors experienced? Not really. I followed more signs than usual, asked a local for directions (once) and never used a CD/cassette, book, physical map or a payphone (I never saw one and didn't have any coins even if I needed one). Unlike the ancestors, I stayed connected. I looked up transit instructions, and communicated long-distance with people pretty much at all times.

While I wouldn't recommend international travel without a phone, it's quite doable in 2022 with just a laptop/iPad and a cellular watch (international roaming will roll out later in 2022). Just bring a camera to document your trip!

#travel #lifestyle #apple #life

Enter your email to subscribe to updates.